The essential guide to the fishing knots every angler should know
Chris Smith takes us through some simple knots, all of which are easy to learn and are effective for most fishing situations.
Knots can be confusing. Have you seen the film Jaws? Picture the scene as Chief Brody is being taught how to tie a bowline by Quint, endlessly going through the instructions … “into the hole, out of the hole, round the back and into the hole again”. If all fishing knots were like that we anglers would be tremendously confused, but thankfully we don’t often have to knot our mono to stop a twenty foot shark. Sorry, … twenty-five!
So, I am going to list the very few knots that I know how to tie. I like my angling to be simple and these knots have served me throughout years of match fishing, team fishing and now through all my pleasure fishing, even on commercials when catching double figure carp. If they work for me, they’ll work for you.
I am first going to be starting off with a discussion regarding the tying of hooks. If you only buy ready tied hooks then you can skip this bit, however not many anglers will go through life without ever tying a hook in some way, I feel.
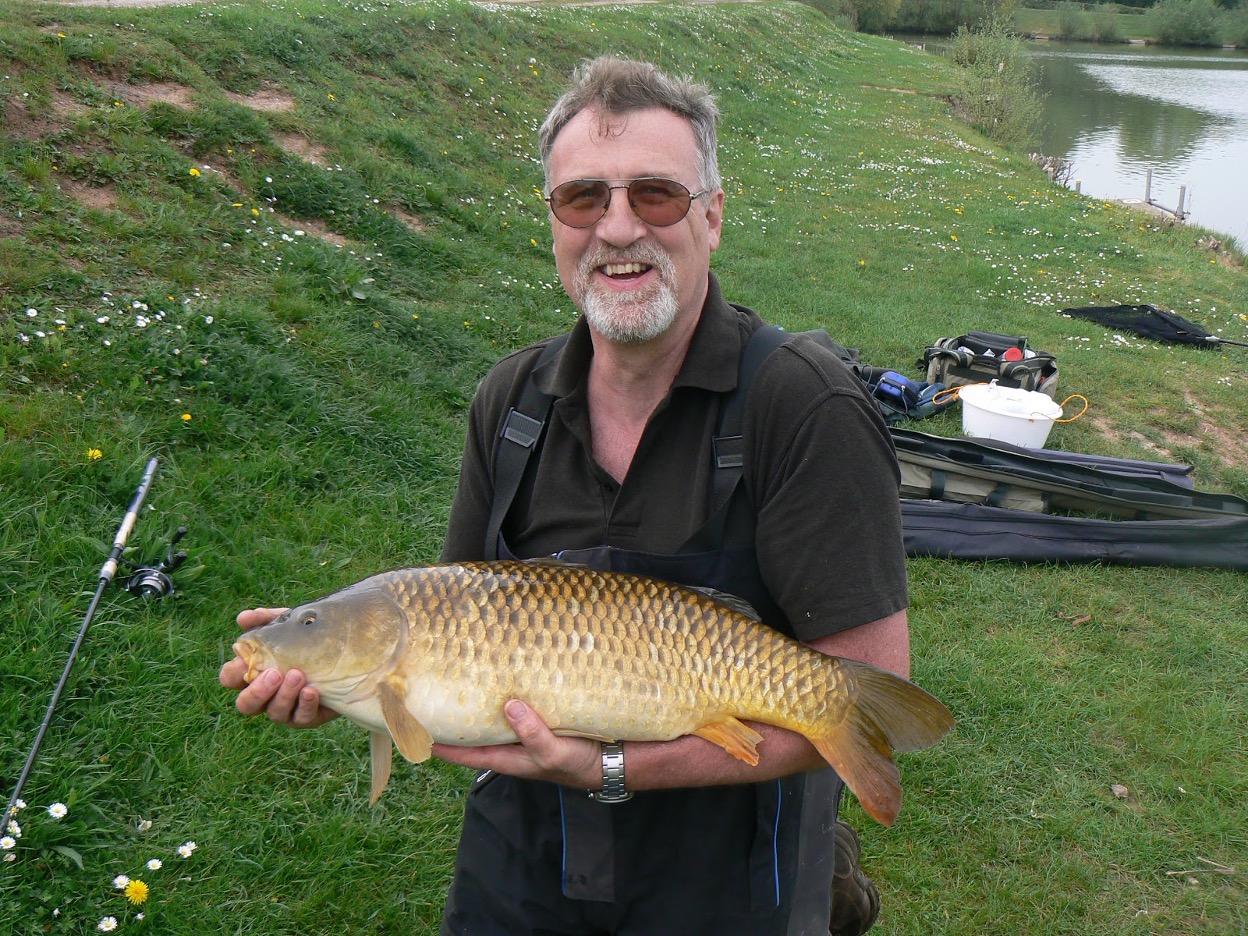
You don’t catch fish like this on a six pound mainline unless your knots are working well.
After discussing hooks I will travel, metaphorically, from the hook to reel, travelling right back up the line, explaining all the knots I use along the way, finishing off with tying your line to the spool. Because I am a fairly simple fellow I will completely ignore any knots that I personally don’t know how to tie, and I further pledge that the knots I use in my own fishing have served me well for many years, and they absolutely are the simplest ones I can find that do the job right. I hope I can simplify your knot tying too. Enjoy!
Gadgets & Contraptions
Everybody likes gadgets and contraptions. This is lucky for us because there are three contraptions that are indispensable when tying fishing knots.
- Matchman Hook Tyer
- Hair Rig Tyer
- Loop Tyer
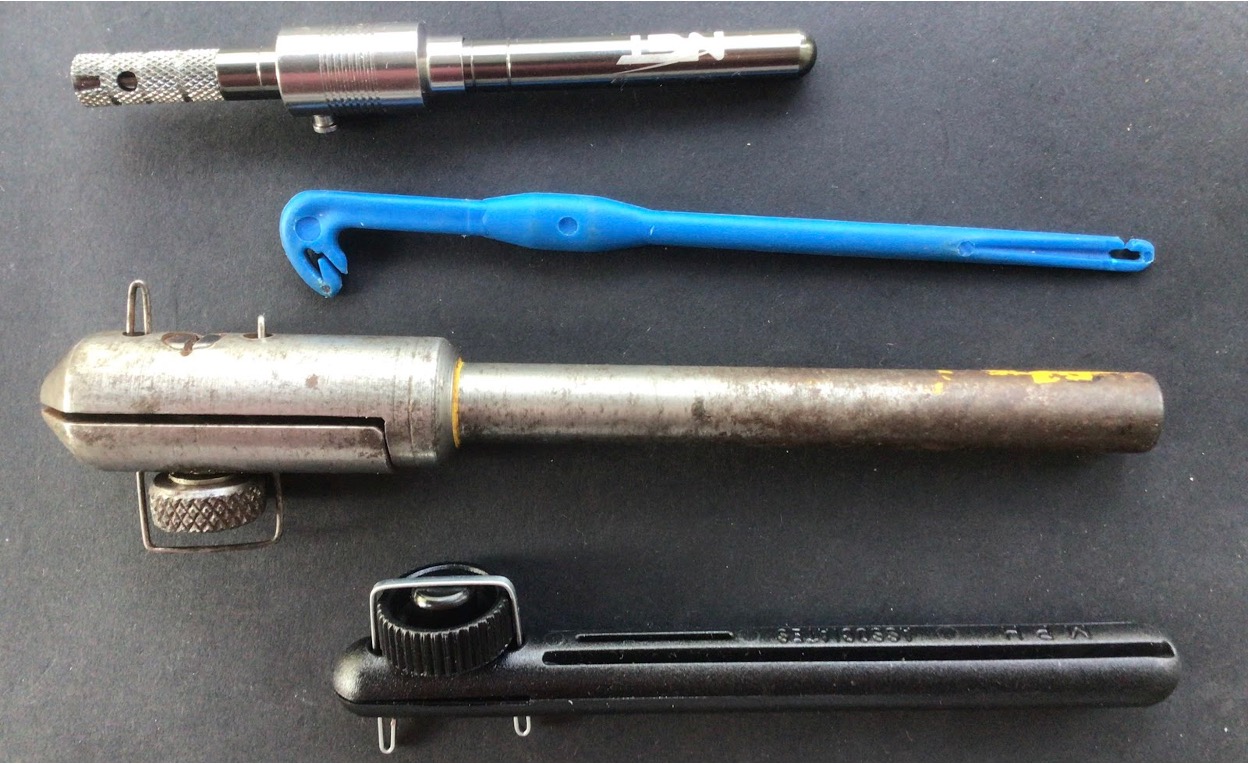
Everyone likes a gadget don’t they? From top to bottom:- A hair-loop hook tyer, a loop tyer, a home-made hook tyer and finally a Matchman Hook Tyer
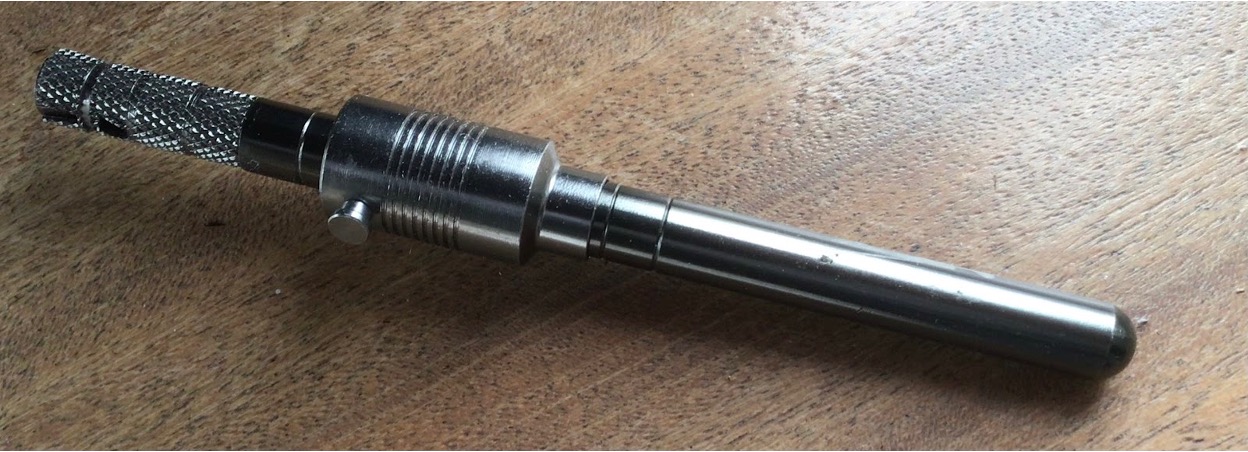
When tying spade end hooks use the Matchman Hook Tyer
If you are into tying your own small spade-end hooks you need a contraption. I have just the tool for you … the ‘Matchman Hook Tyer’. This contraption has been around for as long as I can remember and I was fortunate enough to learn how to use one many years ago in a previous century, more precisely in the early eighties, though the Matchman predates that.
The Matchman is virtually indispensable for tying very small hooks.
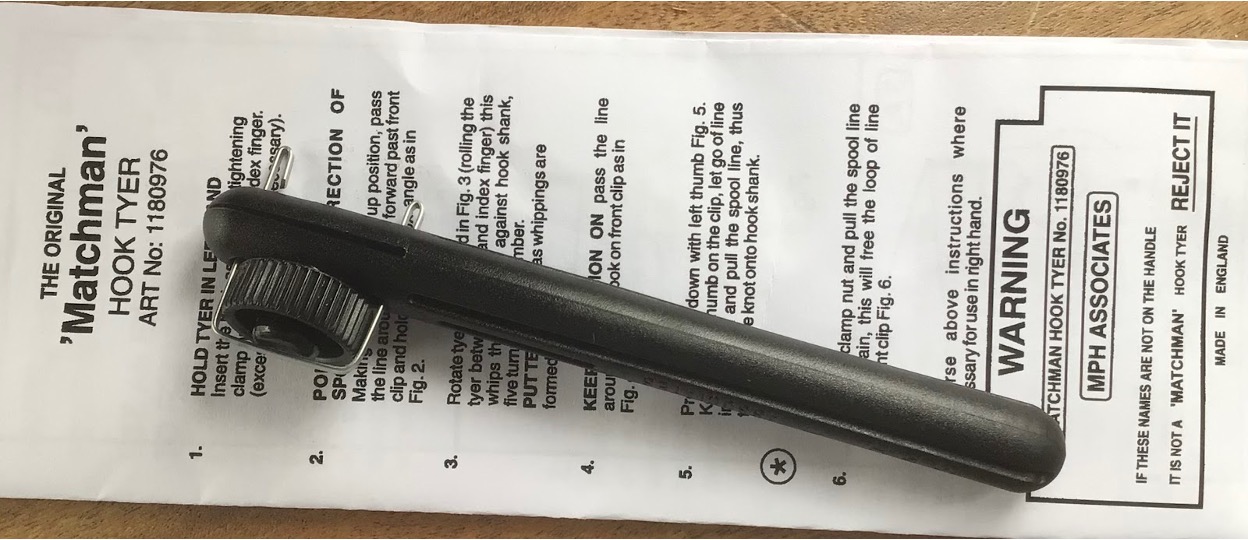
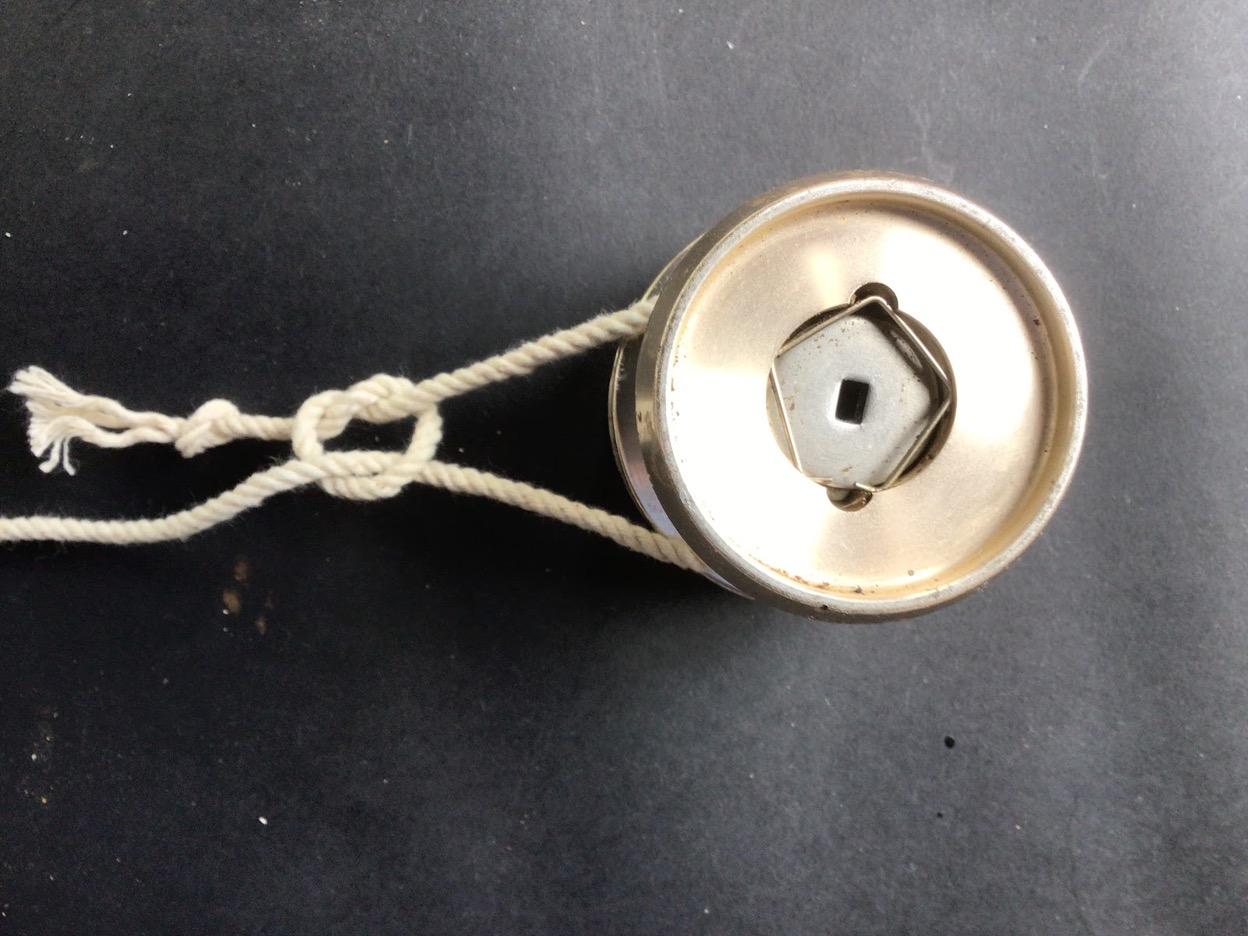
This is the Matchman Hook Tyer. I just purchased this one for this article and it cost well under a fiver (my first ever was £0.99, way back in the early eighties). If you want to put the perfect hook with your perfect line you simply must learn how to tie your own hooks, from then on there is no going back.
When I started match fishing we regularly had matches on the canal and thought nothing of tying very small spade-end hooks to very light line. We could not have achieved what we did without using the ‘Matchman Hook Tyer’. We used hooks as small as size 32 attached to a 6oz hook length, this was because in many matches we were ‘gudgeon bashing’ and back then the canals were infested with them.
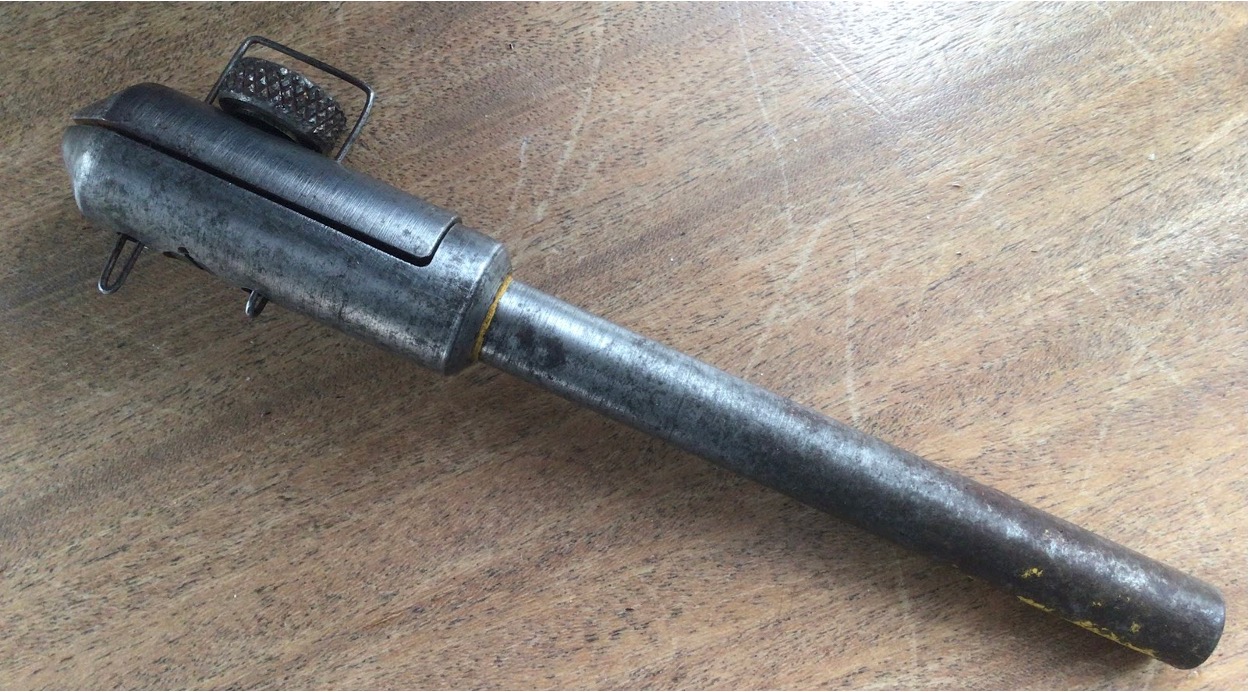
This is my own home made ‘improvement’ on the Matchman Hook Tyer. Made of steel it has very close fitting jaws that can ‘pinch’ down onto the smallest hook and hold it so tight that it cannot move. It used to be painted bright yellow and I reckon it weighs a ton, however I love the ‘heft’ in my hand and couldn’t now go back to using the shop bought version. It has served me for more than thirty-five years and one of the reasons for that is that it is almost impossible to lose.
Hooks as small as size 32 are incredibly difficult to even handle, let alone tie by hand without some sort of a contraption-based assistance. For me these days a size 24 is the absolute smallest hook I now tie, and because my fingers are now more sausage-like and my eyes are more myopic, I find size 24 are difficult enough even WITH the aid of the Matchman, ……. and trying to tie a size 24 without is a complete pipedream!
Six stages of tying a spade end hook with a ‘Matchman’


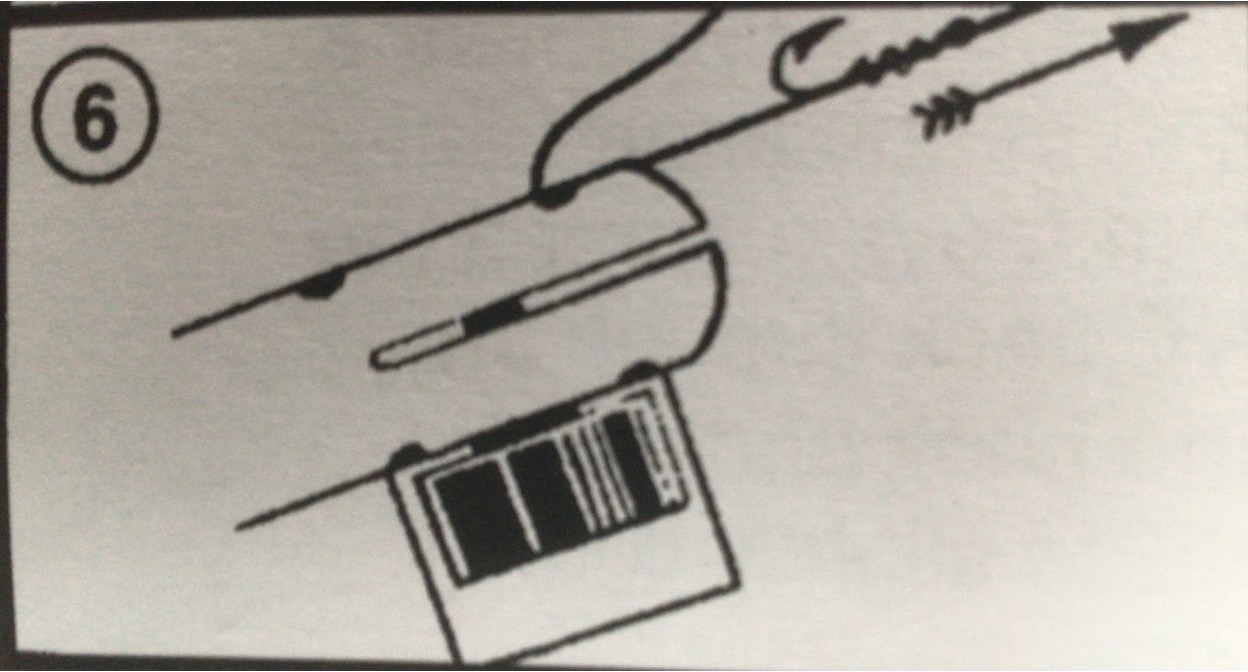
So, … my first recommendation is to buy a Matchman Hook Tyer and learn how to use it. There is really only one knot that works on a spade end hook, and running ten or eleven whippings down a small hook without the aid of some kind of tool is unthinkable.
Knotless Knot : Essential for creating hair rigs with eyed hooks
The other kind of hook, the EYED hook, can also be tied with whippings along the shank, which is lucky because there are two ends to any knot and one of the ends becomes very useful when it is turned into a hair.
The Knotless Knot is so called because no part of the line is actually tightened down against any other part, at least in any traditional sense. The final act of passing one of the ends through the eye of the hook holds the ‘knot’ in place but this is more akin to someone putting a finger in place to hold the knot, take the finger away and the knot could just fall apart. Nevertheless, don’t let this put you off, because the eye stays where it is constantly acting like the finger that keeps the knot tight. A knotless knot has accounted for more carp than any other knot out there. And if it hasn’t I don’t have a clue how you would prove me wrong!
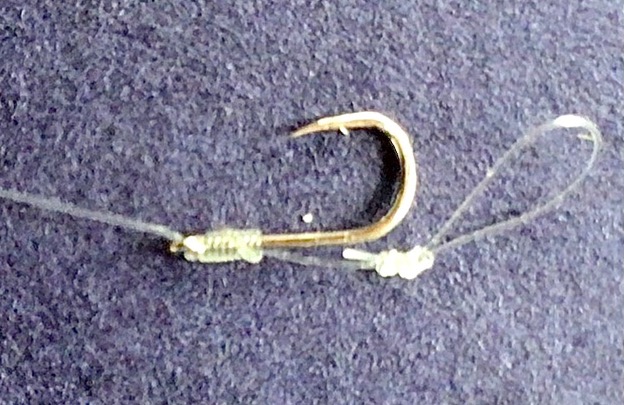
As can be seen from this photo, showing an eyed hook tied with a ‘knotless knot’, coarse anglers often keep the free ‘tag end’ of the knot in place and use it to create a hair. As you can see, because there is a loop tied in the hair, it would almost be impossible in this case to tie this loop after the knotless knot was tied, it is simply too close to the hook and the other knot. To achieve this you must tie the loop first (using a hook tyer?) and then the hook is tied in situ using a Hair Rig Tyer. (See below.)
When tying eyed hooks with a knotless knot use a Hair Rig Tyer
Eyed hooks are very commonly used these days, especially on commercial venues. I never used an eyed hook for the first forty years of my life, thinking that they were only for specimen hunters and that they were too heavy and lacked finesse. Commercial fishing changed all that.
Ideally, when a hair is not required, the tying of an eyed hook is no more difficult than when tying a swivel, requiring the simplest of knots (The mighty Palomar knot). However, because eyed hooks are frequently paired with a hair, I find benefit and great use for another contraption. A Hair Rig Tyer.
I still don’t use eyed hooks for most of my natural-venue stillwater fishing, or on rivers, but I find them extremely good for hairs and bait spikes etc and the Hair Rig Tyer is the only option for me when using a knotless knot with hooks in the smaller sizes.
For tying any kind of small loop in your line use a Loop Tyer
Loop tyers enable an angler to tie quick and easy figure of eight knots. The figure of eight knot is just a simple overhand or granny knot, but with a twist. That twist is the introduction of one extra turn in the loop that the free end goes through. The extra twist is all important because it transforms the granny knot, which slips easily and has little strength, into the much stronger and slip proof figure of eight. If you suffer problems when tying a loop with a granny knot then get a loop tyer, you will thank me later.

The Loop Tyer is the perfect way to tie non-slip loops of a consistent and repeatable size. As far as I know they come in just two sizes and the difference is in the size of the loop that they create.
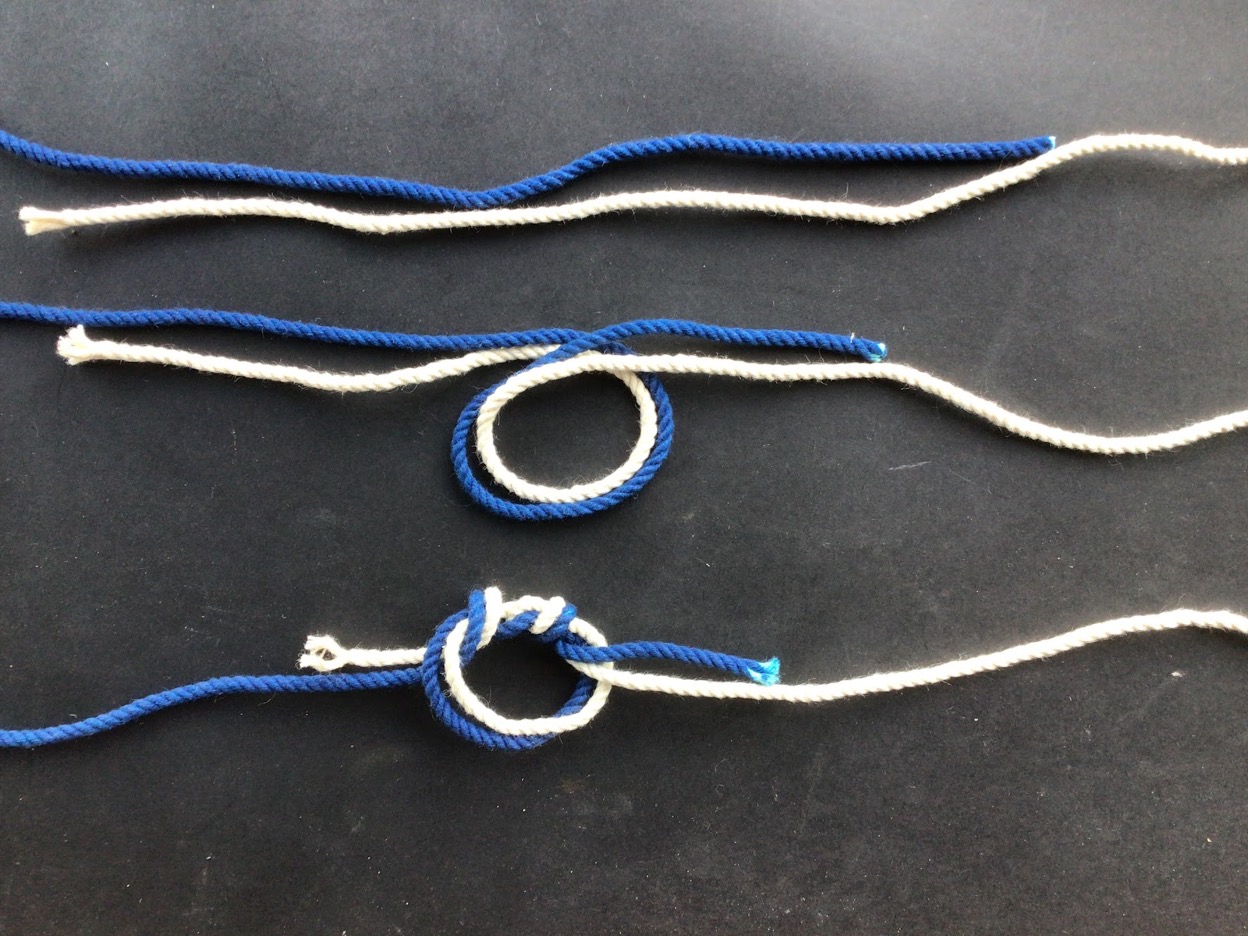
Loop to loop. The correct way and the wrong way. * Very Important!
For the first few years of my fishing life I used to regularly make a mistake. Yes, I know this will be a shock to my Wife, my daughter, and to all who know me but it s true! My grave mistake was that I would use a loop to loop in the wrong way.
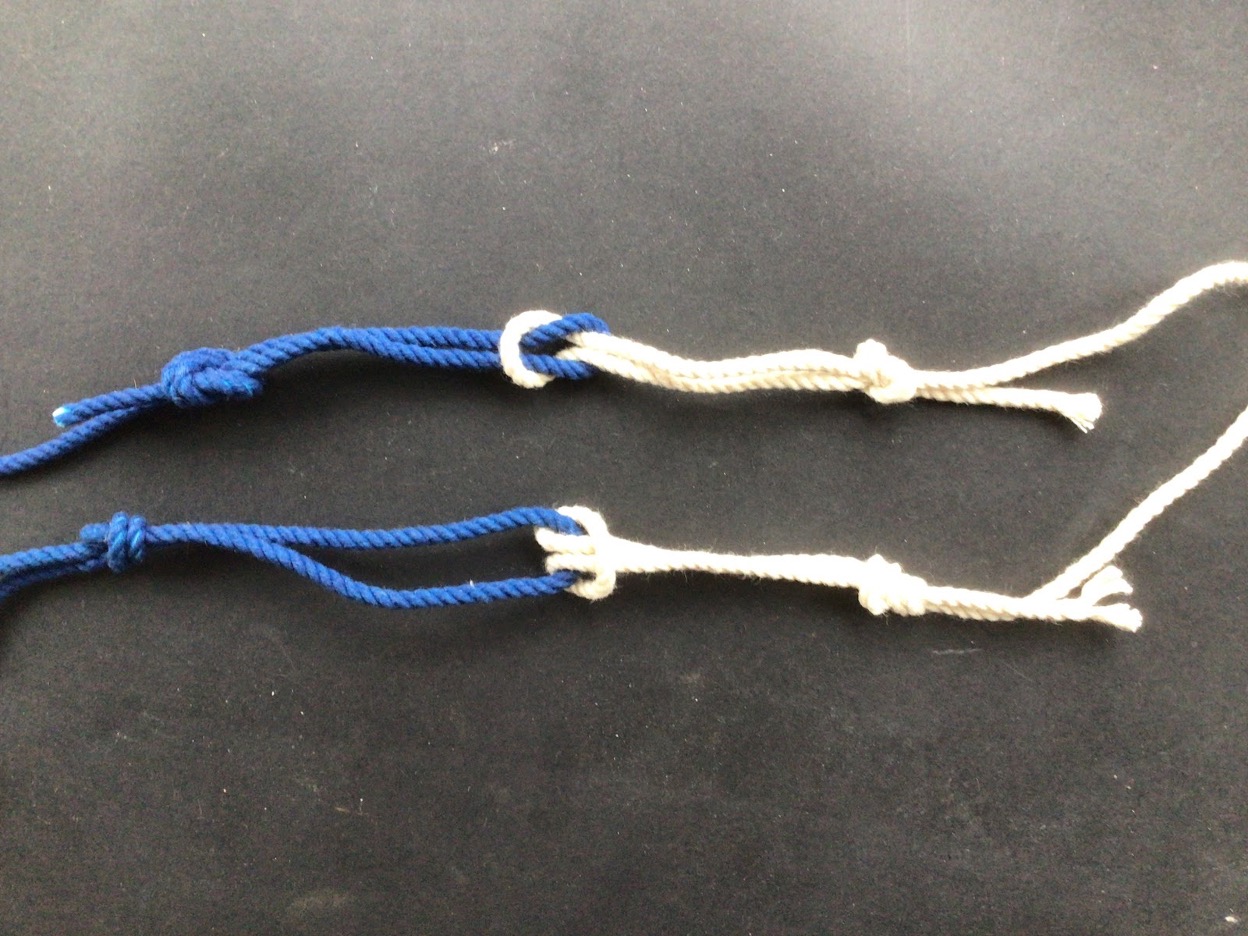
Imagine the blue cord is the mainline and the white is the hooklength. There is a right way and a wrong way to join a loop to a loop. The correct way is the upper illustration where the mainline is passed through the hooklength loop and then the hook is passed through the mainline. The resultant knot ‘slips’ the two loops together when pulled tight. The wrong way is to pass the hook length loop through the mainline and then pass the hook through the hook length loop. This ‘chokes’ the hooklength on itself around the mainline loop and is a weaker knot.
Figure of Eight Knot : For loops that don’t slip
Have you ever tied a simply Granny Knot to create a loop only to have the knot slide off the line and disappear? The Figure of Eight is a simple improvement on the Granny Knot that will not slip. Thus it is essential for any kind of loop to loop connection (such as hooklength attachment) and also works brilliantly when making pole attachment loops and for creating loops on a hair rig etc. Very easy to tie it only becomes a problem when you need small consistent loops, thats where the loop tyer comes into its own.
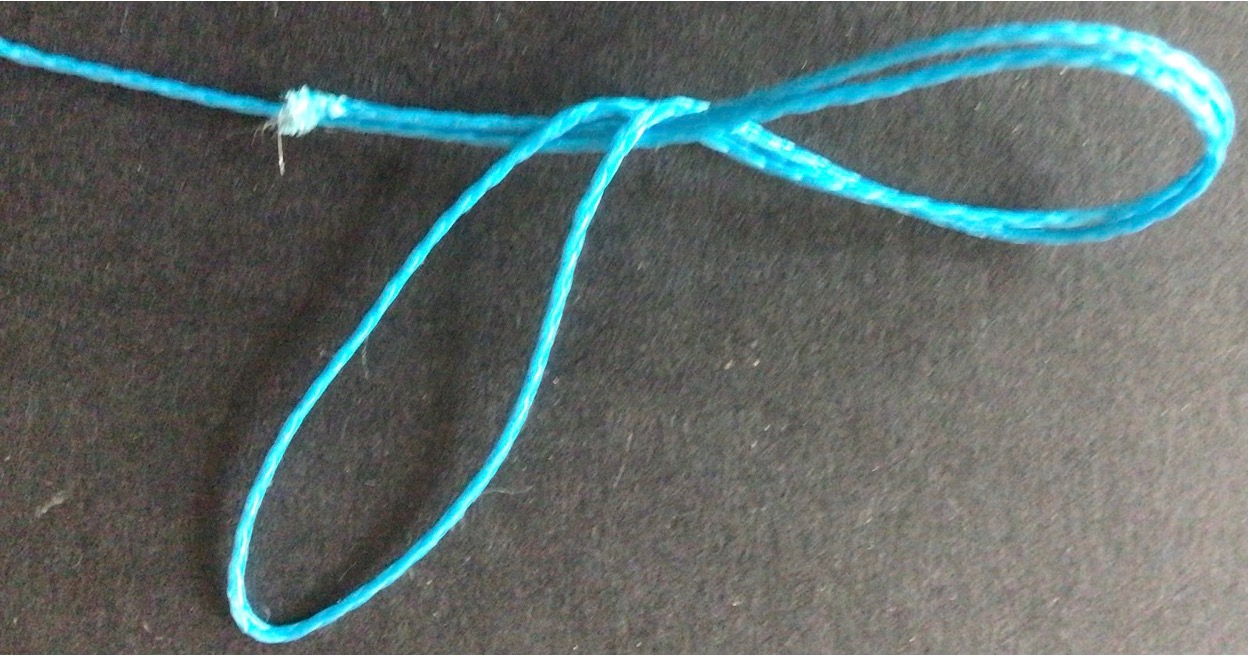
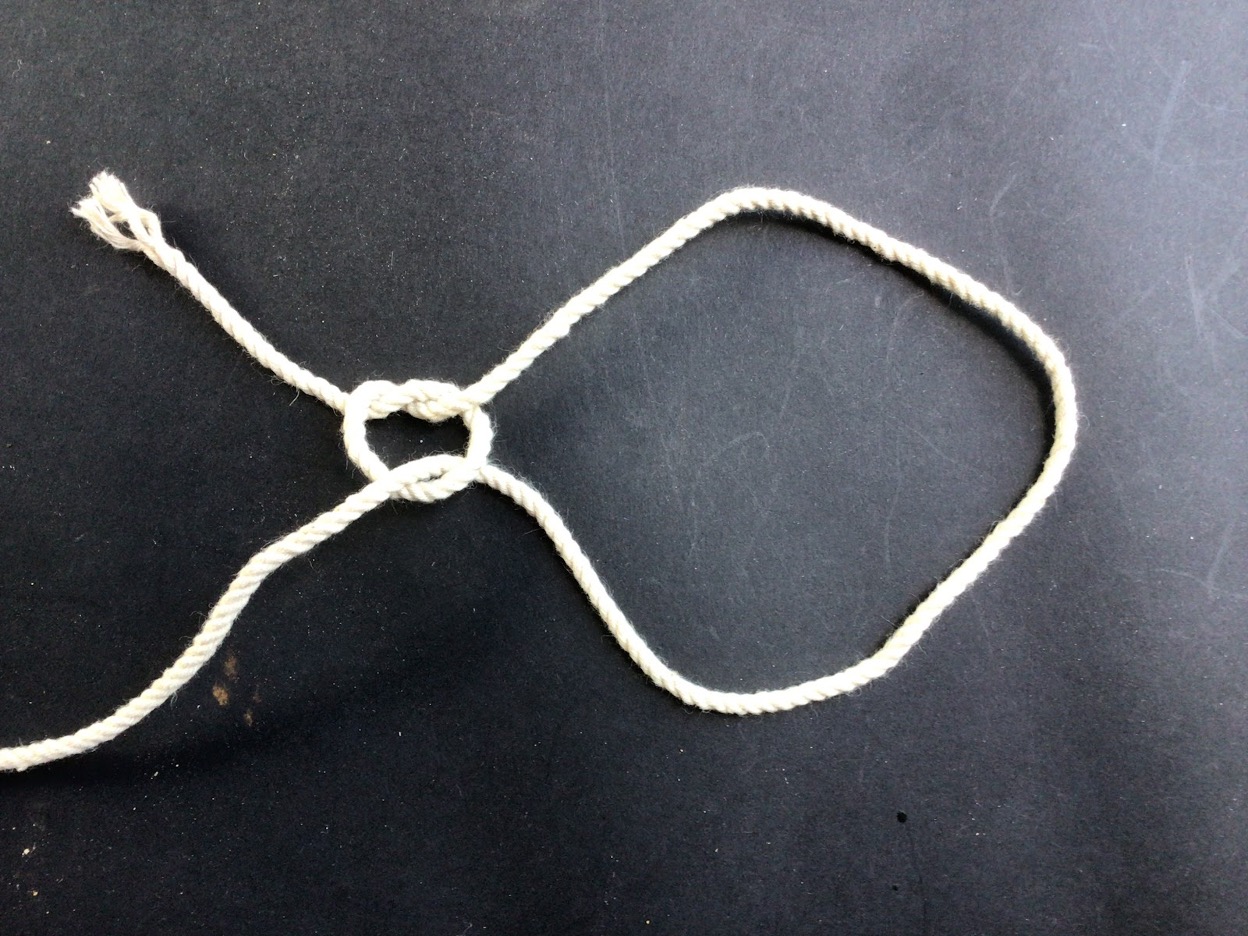
The first stage of tying a loop that doesn’t slip. Ideally, for loops of repeatably perfect size, a loop tyer should be used, however they can successfully be tied by hand too.
Take the free end through the loop from the back, NOT the front. Going through the front will create a granny knot, which is a completely ineffectual way to tie a loop. Taking the free end round through the back creates the ‘figure of eight’ which will create an extremely efficient non-slip knot.
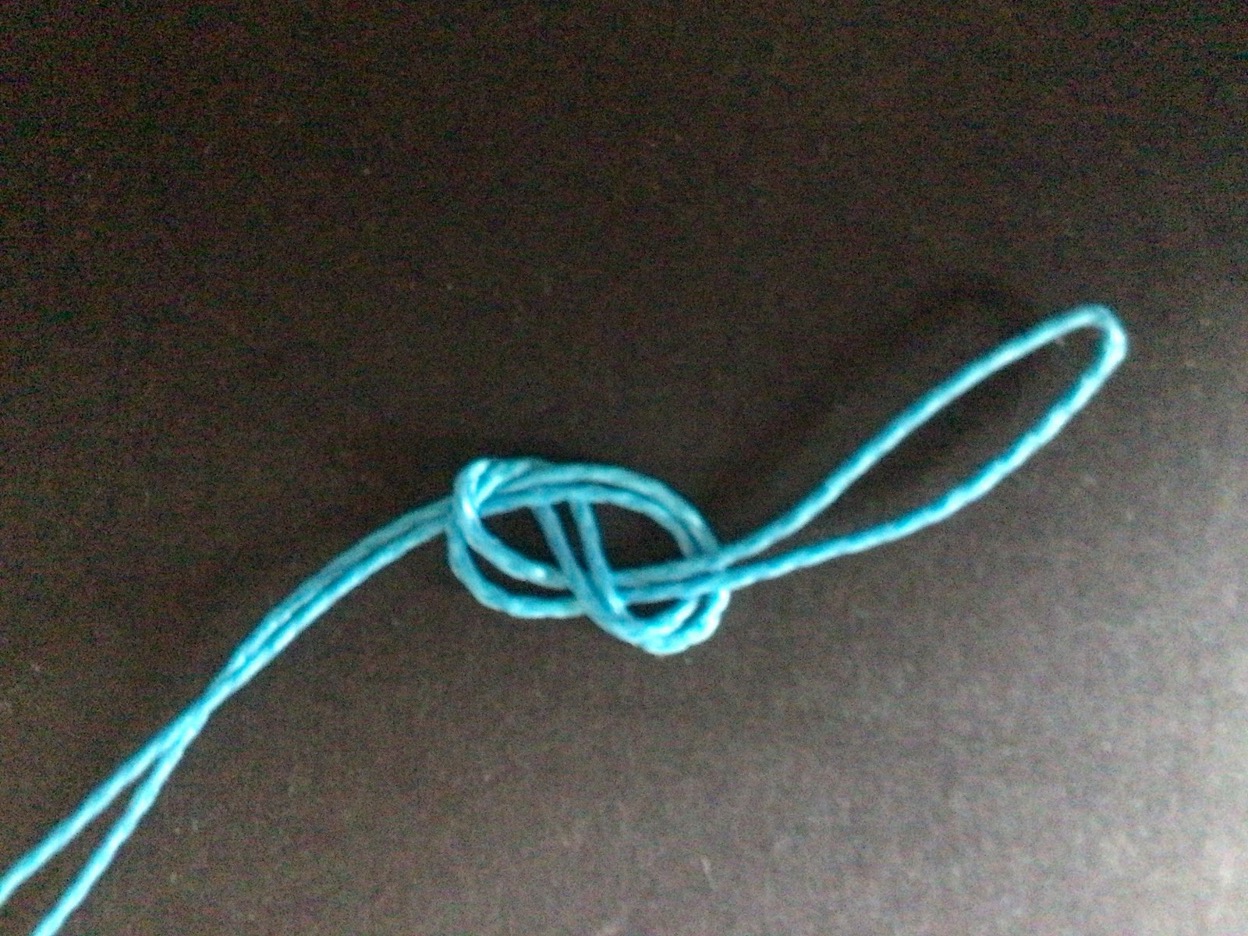
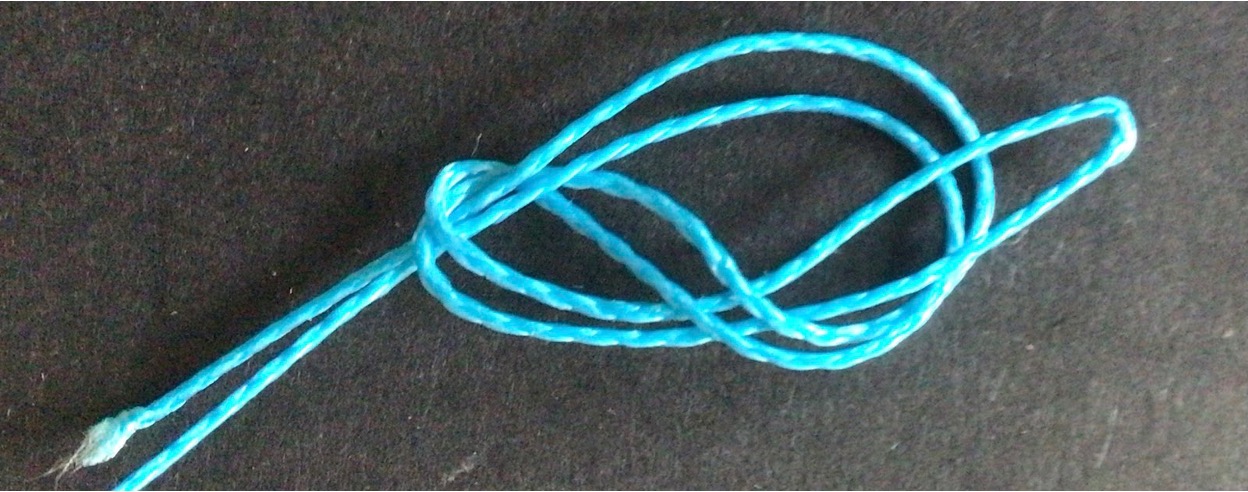
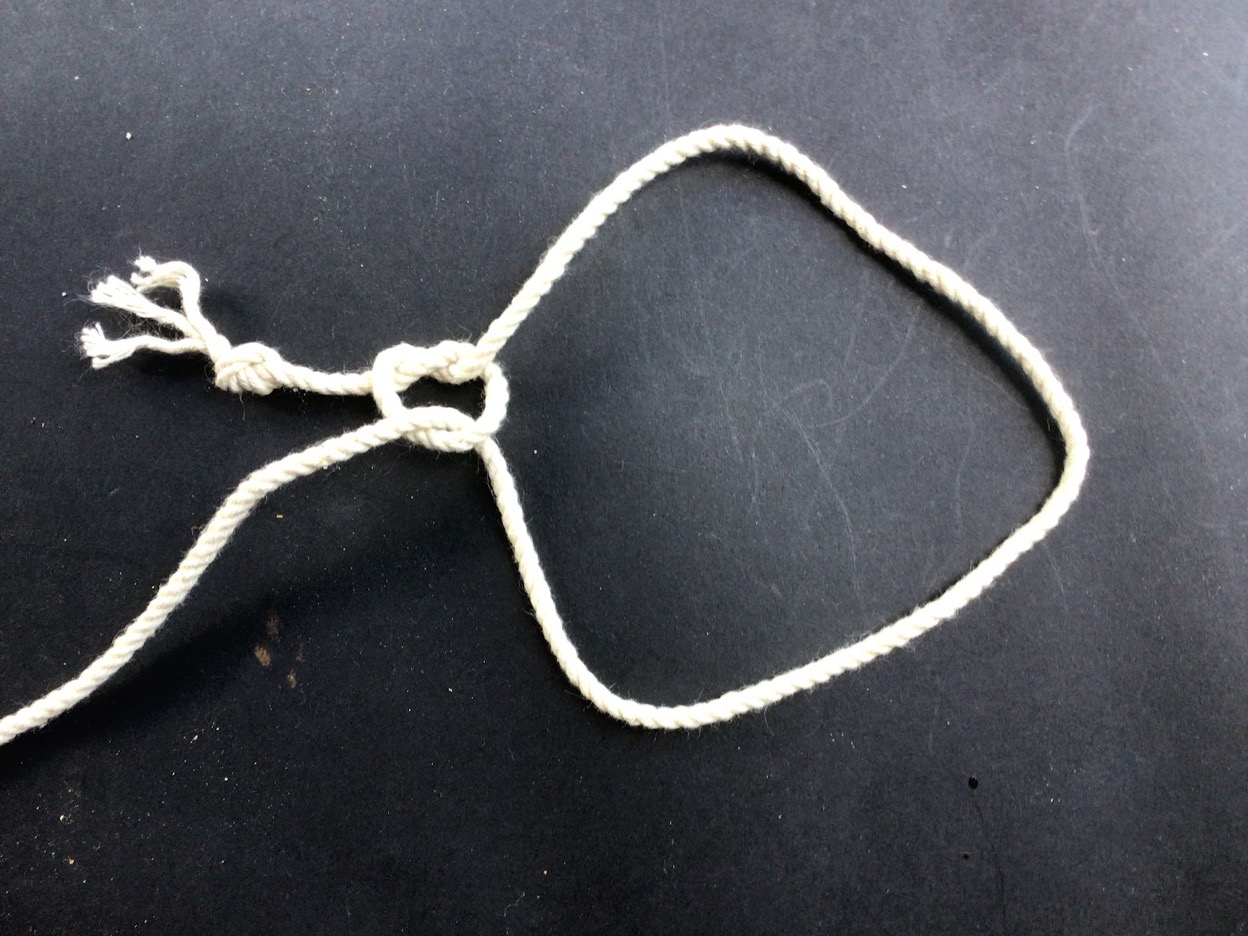
The knot is pulled a little tighter in this photograph and amply illustrates the ‘figure of eight’ that gives it its name.
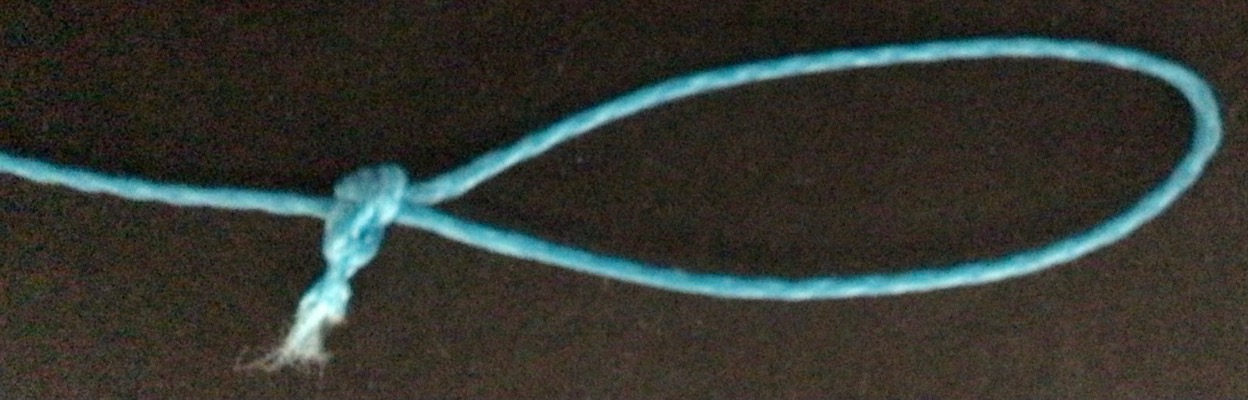
The final knot. As with ALL knots it should be moistened before being pulled tight.
Palomar Knot : Perfect for anything with an eye!
The Palomar Knot is reckoned to be very strong, which is lucky because it is also dead easy to tie. I use it for anything with an eye such as swivels, eyed hooks and hooklink swivels etc.
Here below is a series of photos that should illustrate how to tie a Palomar Knot.
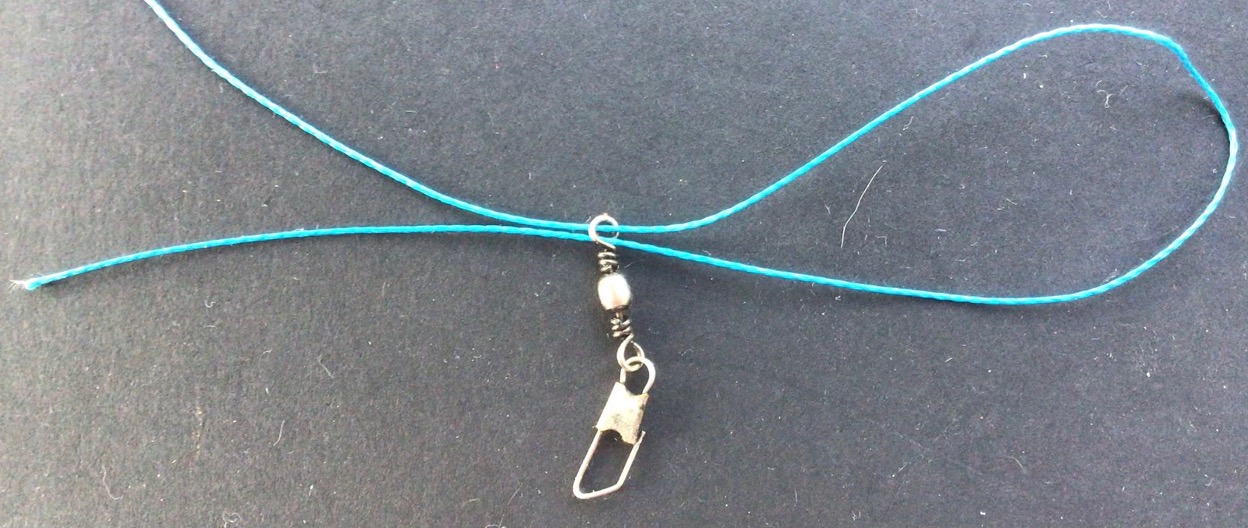
Pass line through the eye of the swivel (or hook – or indeed any other item with an eye) and pass it back through the way it came, as above.
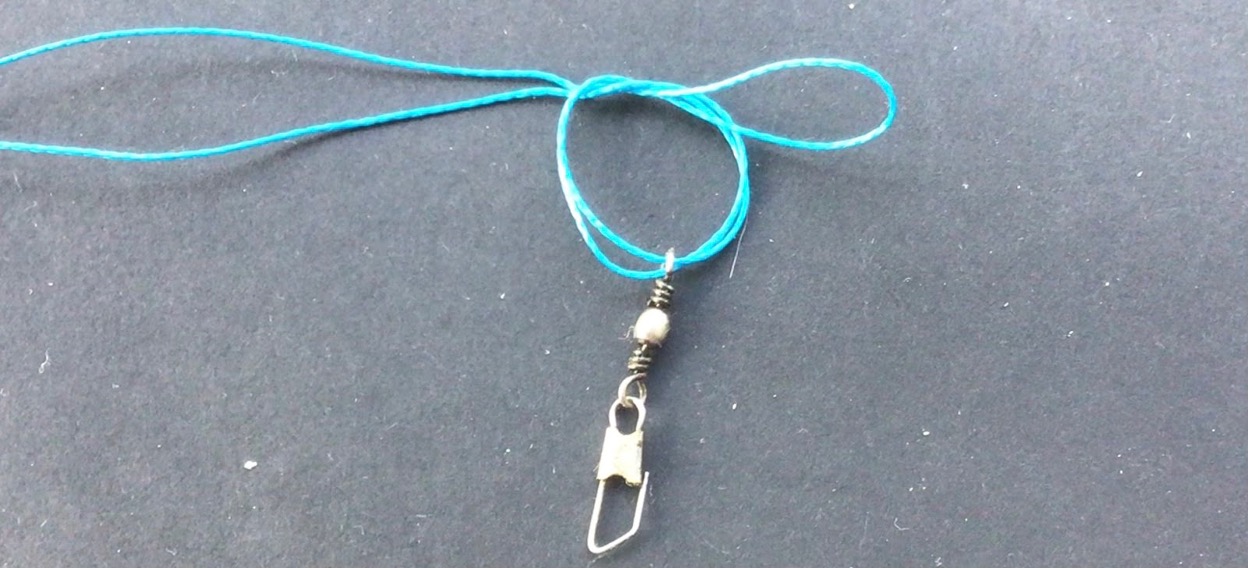
Form a loop with the doubled up section as per above.
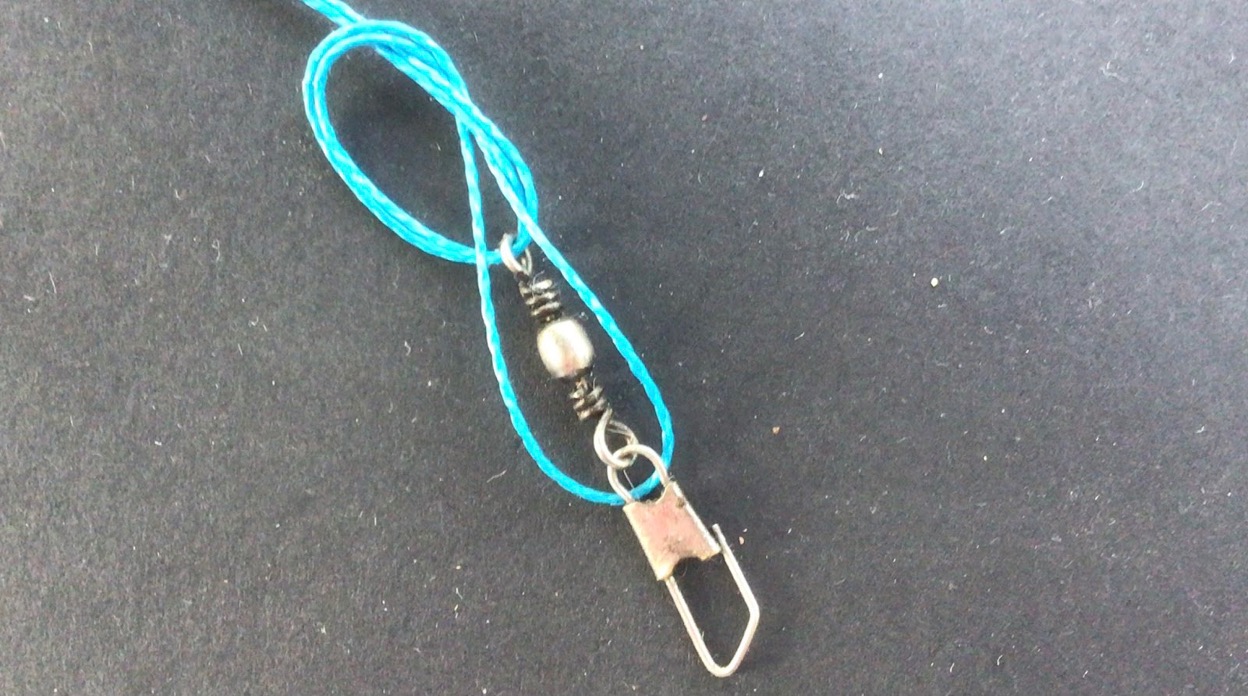
The swivel etc. is then passed through the doubled-up free end of the line.
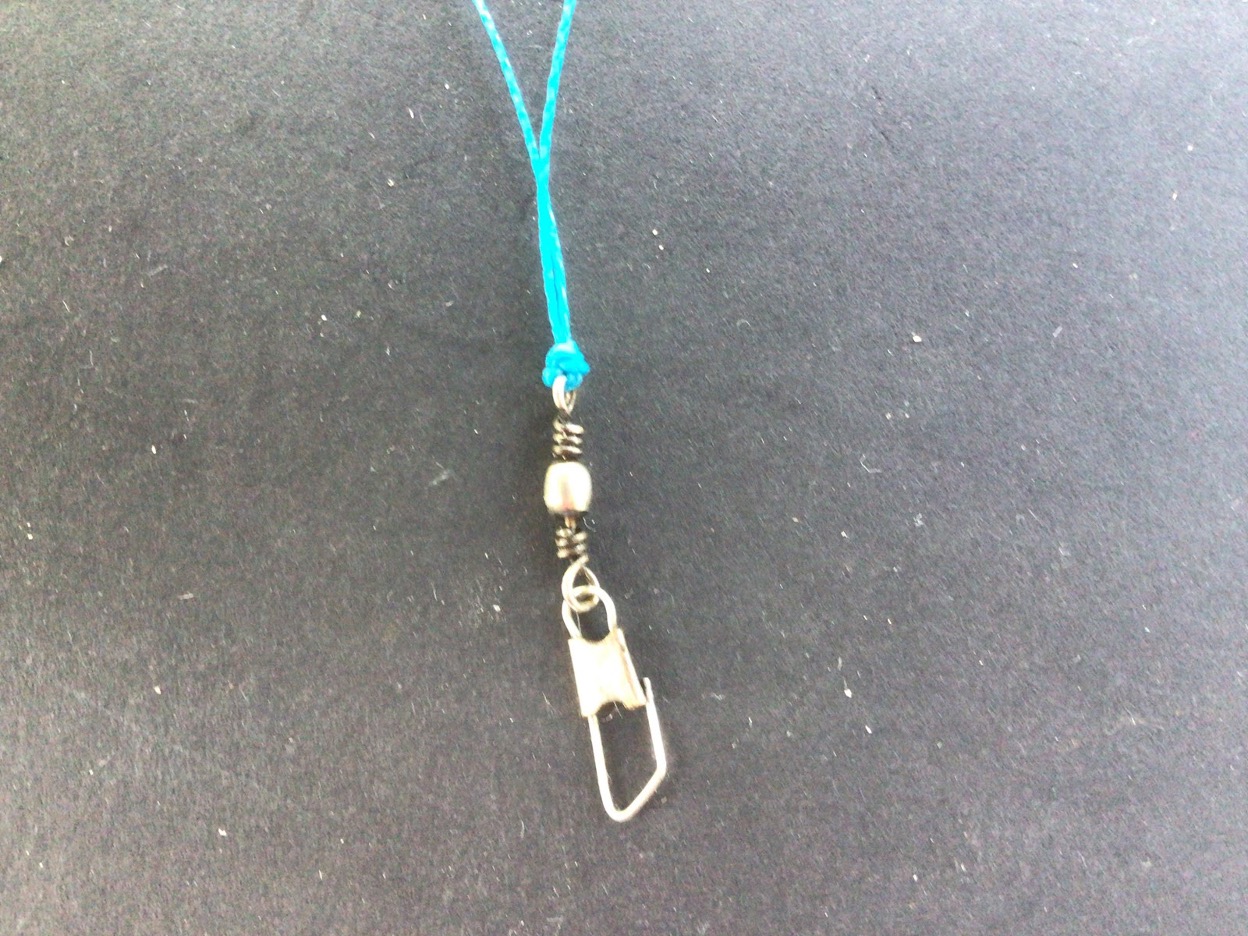
Moisten the knot and snuggle the knot down towards the swivel before finally pulling tight. Cut off the free end to neaten the knot.
Three Turn Water Knot : Useful for joining two lengths of line together
This is a great alternative knot to use when tying short hook lengths to your main line. It is neater than a loop to loop connection and is very good when joining a thinner line to a stronger. Normally used when a shorter length of line is attached to a longer line (because the whole of one of the lines needs to be passed three times through a loop) it can also be tied with more turns. Hence its big brothers are the four or five turn water knots. I only use three turns because I am lazy and three turns work. So why wouldn’t you?
Three stages of the three turn water knot. 1 lay the lines alongside each other. 2 Form a loop in both. 3. Pass the free ends of both lines through the formed loop three times. Moisten, pull tight and trim as required.
Double Grinner or Double Uni Knot : Invaluable for joining two long lengths of line
Essentially two Grinner knots side by side this knot will join two longer lengths of line together so is great for leaders. It works well as mono to mono, braid to braid, and mono to braid. It will even cope with any of those combinations where one line is thicker than the other.

Each Grinner Knot requires the tag end to be passed through the loop several times. The number of turns varies with the individual. I will usually use five or six turns. The photo shows a three-turn grinner.
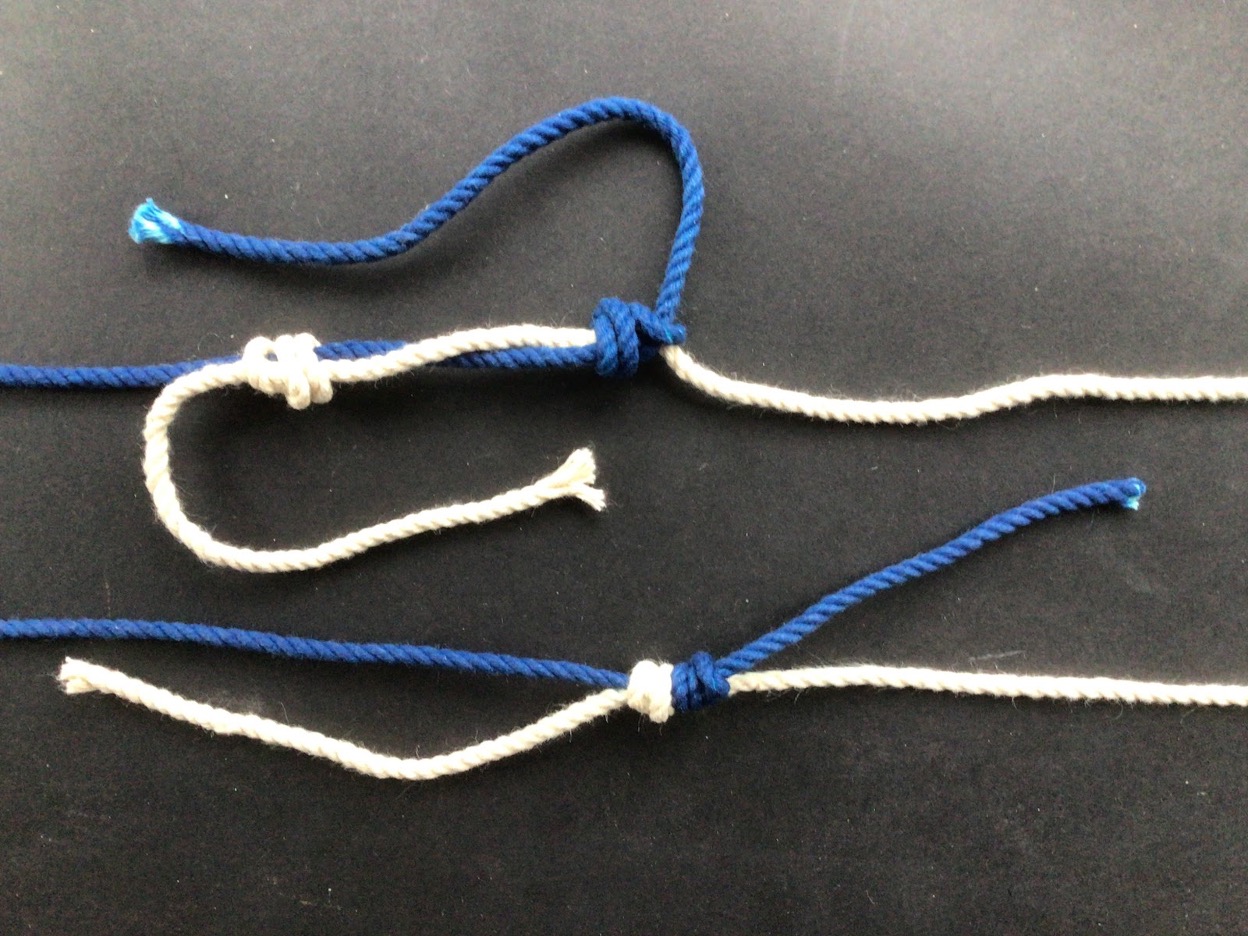
In this photo the upper illustrates where each individual grinner has been moistened and pulled tight. The lower shows the two knots having been moistened and pulled together. All that is required is for the tag-ends to be neatly trimmed.
Arbor Knot
One of the easiest knots for tying your line onto your spool before filling your reel. Simple and effective it will cinch up tight and not slip, keeping your line perfectly in place.
The beginning phase of an Arbor Knot.
The second phase of the Arbor Knot is the addition of a simple overhand knot (aka ‘granny knot’) tied in the free end. You can do this as the first step if it is easier. The purpose of this overhand knot is to provide a backstop to avoid the rest of the knot slipping off the free end.
You can tie the knot and then place it loose over the spool, as I have done, or tie it around the spool as you go. Either way you must now moisten the knot and snug down all the elements together. I always work the knot tight at the rear (back) of the spool before snugging down and I also do not cut the free end off super tight. I like to leave a millimetre or two just in case it slips at the last minute when I finally pull hard. I often use a small strip of insulation tape to cover my knot when tying mainline to the backing, however the arbor will by lying underneath every wrap on your spool and should not catch on any of the ‘working’ section of the line, i.e. the outer layer that you fish with.
The Arbor Knot is not the strongest knot you can use. However, you do not need a strong knot to attach your line to your spool. It is yet another of those urban myths that play out online. If you are ever playing a fish and it takes ALL the line from your spool I am afraid that all is already lost. You will just have to hang on until something goes ‘twang’ no matter what knot you use. In truth, you probably lost the fish the second that you hooked it, and relying on the attachment of the line to the spool is just futile.
Myth busting no 1
Q. Is there a perfect knot?
A. No, is the short answer. Let me expand. What exactly is ‘the perfect knot’? For me, the perfect knot is the one that retains 100% strength, I can tie in my sleep, I can tie in sub-zero temperatures outside even when the wind and rain is lashing my face, that never comes undone … oh, and I would like to use it for every single fishing application. That way I don’t have to learn two knots!
So, hopefully you understand now that there is no such thing as ‘the perfect knot’. Despite this the internet is full of suggestions for a better knot. As anglers we can beat ourselves up when we lose a fish, especially when the line parts at a knot that we have tied ourselves and we then fall prey to those who would try to convince us that there is a better or ‘perfect’ knot out there just waiting for us to use it. There isn’t! You must use the right knot.
Q. What is the right knot?
A. The right knot is one that is relatively easy and quick to tie, provides good strength, and that you, the angler, is confident to use.
Many knots are designed for a particular purpose, like tying your horse to a rail in such a manner that the horse can’t pull free but the rider can release the knot with exactly the right pull on the right bit of rope. We anglers don’t have to worry about that. We don’t have to worry about tying a sail down with a knot that won’t pull free in a force 10 gale either.
An angler’s needs are dead simple, we need three or maybe four knots for just a few applications. Firstly to tie a hook or a swivel, secondly to join two lengths of line together, and finally tie your line to a spool. Simples. Almost everything else is utterly superfluous.
Myth busting no 2
Anglers may often tell you that you are using the wrong knot. They will promote the knot they are using as being much stronger and explain how you need the strongest knot available when fishing. However, there is a flaw in that argument, .. let me explain. To explain, I first need to make the following statement which I hope you will all agree with.
“The weakest link in your end tackle should always be your hooklink.”
I would personally make it mandatory that every angler should use a lesser rated hook length to ensure that if the line breaks it will break at the hook and the fish will be left dragging the minimum possible amount of line behind them. Any other point of view is unsupportable because fish welfare must come first.
I believe that most anglers think that they must always use the strongest knot, but this is not true. Knots are very often rated by their percentage strength (when compared to the breaking strain of the line when there is no knot.) Typically a knot will be rated somewhere between 65% to 80% of the strength of the line it is tied in. The simplest overhand knot, (or granny knot) is rated as low as 45% on some lists.
Equally, though, I have seen the Palomar knot as being rated as highly as being 100% as strong as the line it is tied in. Anyone who has any kind of understanding of physics knows that a 100% knot is manifestly impossible, so that goes to show that you cannot trust a thing you read on the internet. Except for this article, of course. I only deal in facts, ….. and the occasional utterly brilliant lie, of course!
So, returning to knot selection, it follows that if a hooklength is selected to already be slightly weaker than the mainline, the knot in the hooklength will reduce its overall strength rating even further.
Imagine, if you will, a four pound mainline with a three pound hooklength. If we recognise that the 3lb hooklength, after being knotted, only has a remaining breaking strain of (let us say) 75% then that equates to 75% of 3lb. In other words your 3lb hooklength will actually break at 2¼ lb, (which is seventy-five percent of 3lb.)
It follows therefore that the 4lb mainline will ALWAYS remain stronger than the knotted 3lb hooklength – providing that any knot you select for your mainline is rated more than 56% because fifty-six percent of four is equal to two and a quarter. Almost ALL commonly used knots are rated stronger than 56%, so whichever knot you choose will be acceptable.
By far the most important knot in your tackle, therefore, is your hooklength. Get that correct and you can start to rest easy as far as the rest of your rig goes. Tying a knot in your mainline that is easy, repeatable, and sufficiently strong (though NOT the strongest) is quite acceptable, because the hook length should ALWAYS break first..
Similar articles
Make the most of the 2026 river season with this in-depth guide to fishing rivers
If you’re new to fishing rivers, or just fancy a change from fishing stillwaters, this guide will help you make the most of the new 2026 river fishing season. With advice on reading the water, what species to fish for…
Success at The Nyth: 10lb springer proves Wye salmon are still biting
Wye Salmon – 10lb springer at The Nyth & Tyr Celyn Fishery Lodge on May 8th! Read the new owner’s success story and secure one of the final 2 shares.
Fishing for tench
At last, the short days of winter are slowly receding and the promise of spring is in the air. Along the hedgerows snow drops and crocuses abound and if they could speak would surely be saying, “Things are on the…
Our guide to fishing this spring 2026
With the worst of the weather over (we hope!) and with spring finally here, it’s time to clean out that tackle box and get on the bank for some spring time fishing.
Exciting updates from The Folly Lakes: Getting ready for a record-breaking summer
The Folly Lakes in Cambridgeshire is widely regarded as one of the most prestigious big-carp venues in the UK. Known for its seclusion and its incredible stock of original fish, including specimens reaching over 50lb, it has long been a…
Chasing Whiskers: Top 14 Barbel Venues
There is nothing quite like the “three-foot twitch” of a barbel. It’s a drug for the river angler. The sudden, violent bend in the rod that signals a battle with the hardest-fighting fish in our freshwater. Whether you’re a seasoned…
Chasing Giants: A Guide to Catching a 50lb Carp in the UK
For many catching a 50lb UK carp is a lifetime achievement. This guide highlights the venues, elite tactics, and the expert mindset required to land these wary, record-breaking giants in British waters.
A guide to fishing and rod licences in 2026
Whether you want to become a new angler or you’ve been fishing for years, you will be required to obtain the Environment Agency Rod Licence. In this article we explain what you’ll need if you want to go fishing in…
A Guide to Disabled-Friendly Fisheries in the UK
Fishing should be enjoyable and accessible to everyone. For anglers with disabilities or reduced mobility, finding fisheries that accommodate specific needs is important. Here’s a list of fisheries in the UK that offer disabled-friendly facilities, easy access to fishing pegs,…Search by Region or County
Find new places to go fishing in your local area or county by choosing your destination below


Comments